Bulk Import Shopify Content Files from URL links

This tutorial will show you how to bulk import Shopify Content Files using URL links into your Shopify stores Content > Files section

Bulk Import Shopify Content Files from URL links
0 sections

This tutorial will show you how to bulk import Shopify Content Files using URL links into your Shopify stores Content > Files section with the Matrixify app. By preparing a simple spreadsheet with media links, you can quickly streamline your Shopify store’s Content Files upload in bulk.

Start by creating a new spreadsheet file (Excel or CSV format).

In your spreadsheet file add a column called “Link” in the first row. In the “Link” column, paste the direct URL links to your media files (images, videos, documents, etc.). These links must point to publicly accessible files, so Matrixify can download them.

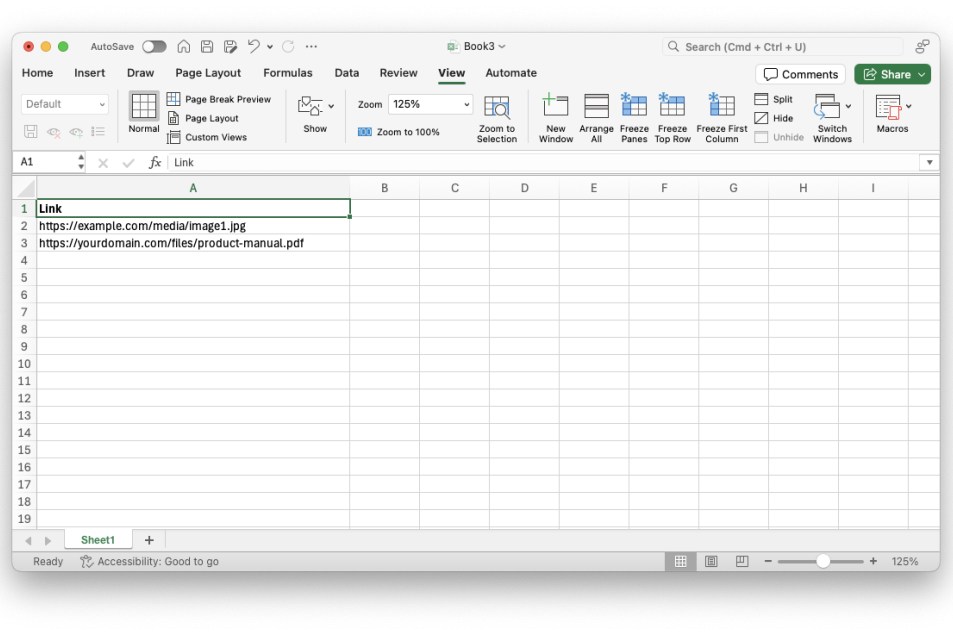
The link can also be an FTP/SFTP server link in the following structure ftp://username:password@server/path/to/file.jpg

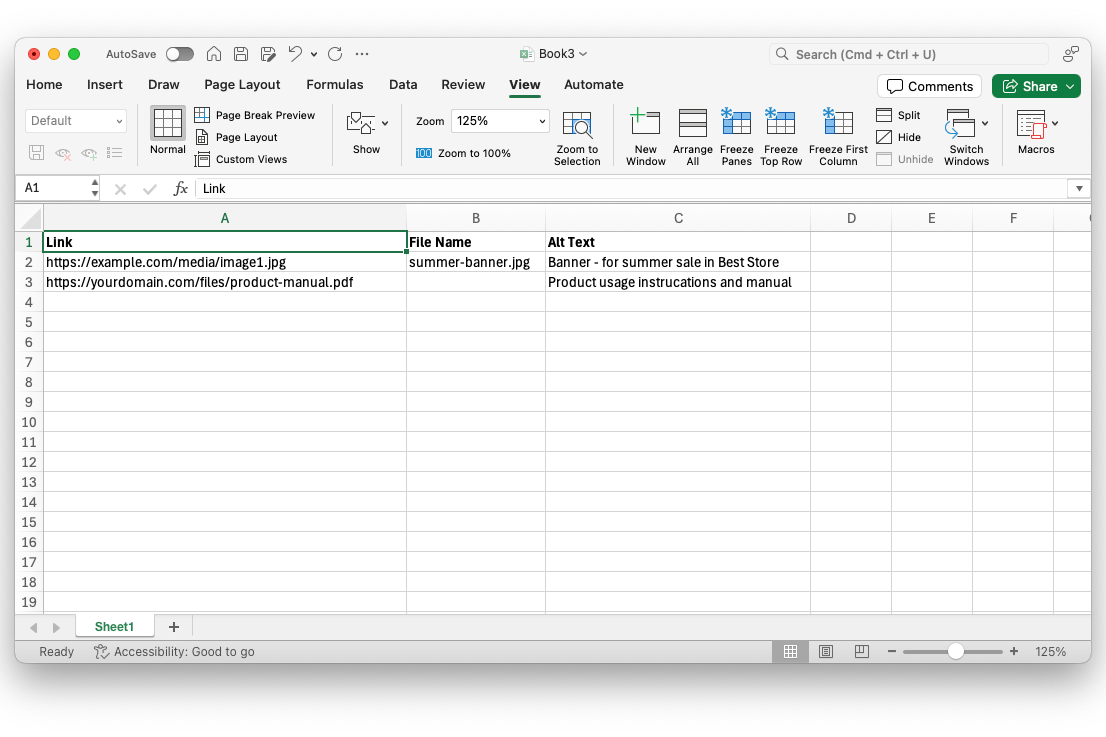
2. (Optional) Add “File Name” and “Alt Text”

Optionally you can enhance your spreadsheet with additional columns:

  • File Name – Specify the name you want the File to have in Shopify. You must also include the same file extension as the file returned by the link. If left blank, Shopify will use the original file name from the URL.
  • Alt Text – Add a short description to improve your Files SEO ratings.
  • Next, you’re ready to upload the file and let Matrixify bulk import everything into your Shopify store. Let’s move to Step 3!

    3. Import Shopify Content Files with Matrixify

    Head over to the Matrixify app within your Shopify Admin and upload your saved file to the Import section.

    Once uploaded, Matrixify will automatically analyze the file. Review the details to ensure the sheet is correctly detected as “Files” and that the item count looks correct, then simply start the import by pressing the “Import” button.

    Once the import is complete, all your media will appear in the Content > Files section of your Shopify Admin, ready to be used across your store wherever needed.

    Original guide here

    Tags
    Sources

    Related Articles

    Boost Sales Today: The Simple Power of Free Shipping Thresholds for Shopify Stores
    Tips & Tricks

    Boost Sales Today: The Simple Power of Free Shipping Thresholds for Shopify Stores

    Discover how implementing a strategic free shipping threshold can dramatically increase your Shopify store's conversion rates and average order value. Learn quick, actionable steps for both merchants and developers to set up and optimize this powerful tactic within a single day.

    May 16, 20266 min
    Boost Conversions: How to Add a Countdown Timer to Your Shopify Store
    Tips & Tricks

    Boost Conversions: How to Add a Countdown Timer to Your Shopify Store

    Learn how to add an urgency-driving countdown timer to your Shopify product pages and sales promotions. This tutorial covers methods from theme editor blocks to custom Liquid code and when to choose a dedicated app, helping you drive conversions.

    May 14, 20268 min
    Convert a Shopify Section to a Block (Horizon Theme version)
    Tips & Tricks

    Convert a Shopify Section to a Block (Horizon Theme version)

    In Horizon, Shopify allows developers to convert standalone sections into reusable blocks, giving merchants even more control in the theme editor. Let’s walk through the process step by step.

    May 10, 20267 min
    How to Add Tailwind CSS to Shopify
    Tips & Tricks

    How to Add Tailwind CSS to Shopify

    Learn how to add Tailwind CSS to Shopify for faster, responsive design. Enhance your store’s look with clean, utility-first styling. Perfect for theme customization

    May 10, 202615 min